In the case of a bad fall, those wearing an Apple Watch might have help on its way, thanks to its Fall Detection which can recognize impacts forceful enough to cause medical emergencies. Having Apple’s technology set up prior means that when the unexpected happens, the watch can use its smart settings to help.
In the past, other devices have afforded shoppers a way to summon aid in case of emergency in times when using a phone isn’t possible, and it’s a good idea for acute injury, the elderly and others with disabilities. This smart device uses Fall Detection to take that same principle of accessibility a step further through a design that can judge when a fall has occurred without any input from the person. That way, the watch can react to the emergency to get people the help they need without delay.
Apple explains that while Fall Detection is enabled on an Apple Watch Series 4 or newer, the smartwatch will recognize falling impacts and then tap the wearer on the wrist while showing an alert on the watch before sounding an alarm. The owner can contact emergency services using this alert, or cancel it in a few ways. Pressing on the Digital Crown, tapping the ‘I’m OK’ button, or hitting ‘Close’ in the top-left corner will all cancel the alert. If emergency help is needed, dragging the red ‘SOS’ dial will call out to emergency services. Ending that call is as simple as pressing the ‘End Call’ button and tapping ‘Yes’ when the option is presented. If the wearer doesn’t interact with the alert and they are immobile, the watch automatically makes the call after around one minute has passed. After that call ends, the emergency contacts from the owner’s Medical ID receive a message telling them a hard fall was detected by the watch and emergency services have been contacted. If the wearer is moving, the watch will await a response but will not place an emergency call until it considers the owner to have stopped moving for about one minute.
Specifically, the wrist tapping and alert will activate as expected. If no motion is detected for thirty seconds the alarm begins sounding and becomes progressively more loud to try to get the attention of the owner or anyone else in the area. While the alert can still be be cancelled, if it isn’t then during the emergency call the watch will use a voice message at full volume to tell the dispatcher the location in which the fall was detected in the form of coordinates. After this message plays the first time, the audio will be lowered and the wearer or anyone nearby can speak with the dispatcher. However, until the automated message is stopped by pressing ‘Stop Recorded Message’ on the watch it will continue playing the message which reads out coordinates. The automatic call requires Wrist Detection to be turned on, which can be accomplished by opening the ‘Settings’ app on the watch, pressing ‘Passcode’ and setting Wrist Detection to the on position.
Managing Fall Detection
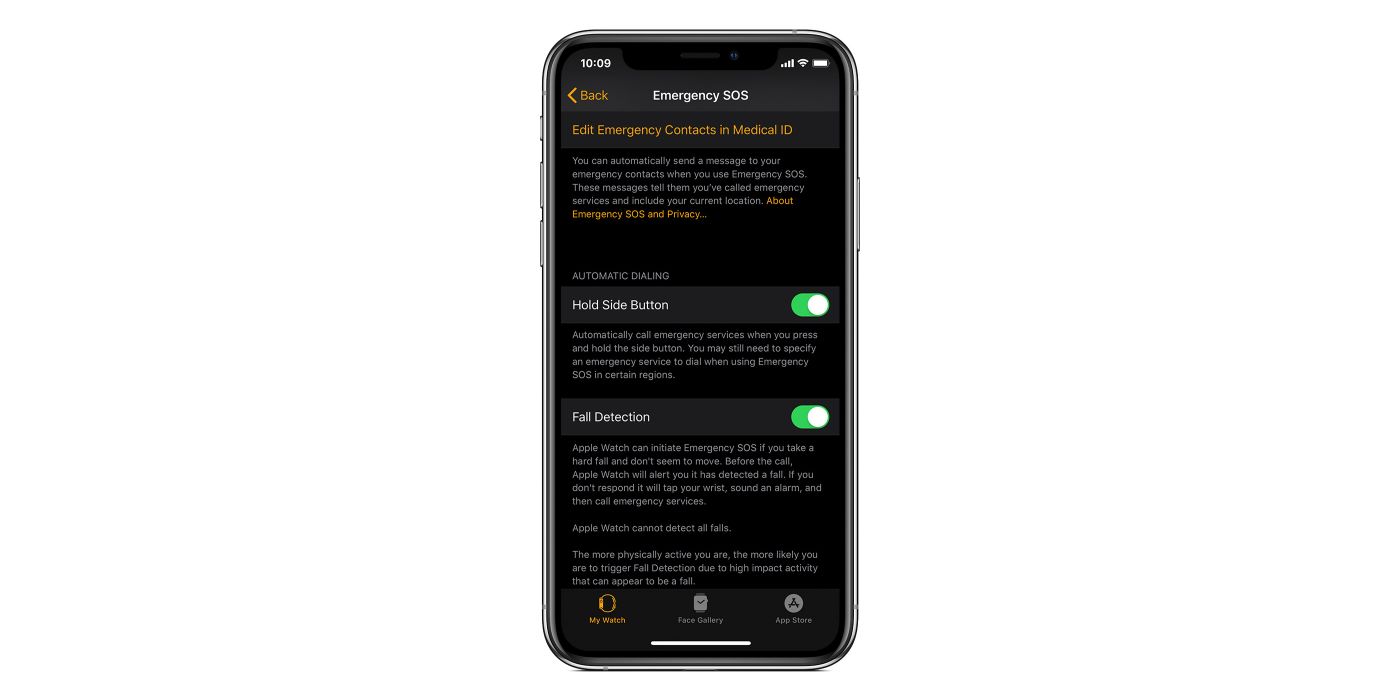
It’s best to configure emergency settings as soon as possible. To enable Fall Detection, open the ‘Apple Watch’ app on an iPhone and select the ‘My Watch’ tab. Select ‘Emergency SOS’ and use the toggle button to turn on Fall Detection. In some cases this may already be enabled. If during setup the buyer entered their age on the Apple Watch or Health App, users 55 and older should automatically have Fall Detection turned on. Still, there are a few more things to be aware of. It’s possible that Fall Detection may be triggered by high physical activity, generating a false alert because of the way the watch detects impact, and because not all countries have a single emergency number the watch will attempt to contact ambulance services specifically.
As for the Medical ID settings and emergency contacts, these are managed by opening ‘Settings.’ tapping ‘Health’ and then choosing ‘Medical ID.’ Pressing ‘Edit’ allows certain health information and the date of birth to be entered. Under ‘Emergency Contacts’ is an ‘Add’ button — shown as a green circle with a plus sign inside — which can be used to add new contacts and indicate the personal relationship to them. Conversely the ‘Remove’ button marked by a red circle with a minus sign in the center removes a chosen contact from these settings. Turning on ‘Show When Locked’ allows the Medical ID to show up on the Lock screen so responders can see important medical information. Then just hit ‘Done’ and the Apple Watch settings will take effect.